Rainy Day Dish Expands… A new Blog & Christmas Ornaments!

To all Rainy Day Dish Loyal Supporters.

The little (and unfortunately neglected) cooking blog is going through exciting changes. Starting in the New Year, Rainy Day Dish will be a full blown lifestyle / DIY website. Our new website will be www.rainydaydish.com. We will have recipes, reviews and a whole bunch of party ideas and DIY projects. What better way to kick it off right then to roll out a sneak peak of what’s to come!

I am excited to announce that Rainy Day Dish is doing Christmas! The offering will include an array of different homemade ornaments rounded out with gift tags and wrapping options. Refer to the attached Holiday Collection for more specific information on each ornament! Quantities are limited so get this little piece of Rainy Day Dish History while you can!

OLYMPUS DIGITAL CAMERA

Click here to check out the new Holiday Collection…

RainyDayDish – Holiday Collection

Order form here…

Rainy Day Dish – Order Form (2)

Feel free to contact me with any questions, orders, or just to say hello!

xo.

Jenn


Easy Indian

There are always those recipes that are your easy go tos… whether it’s for a quick week night meal, a last minute dinner party, or an easy meal while on vacation. They typically consist of ingredients you have on hand that can be thrown together in a few steps ideally using as few dishes in possible. (Those that know me.. or should I say clean up after me.. will contest to the mass amounts of dishes I tend to accumulate creating the simplest dish.. so anything I can do to alleviate that is a plus.) The problem with these dishes is I typically forget along the way to take any photos…. And as I find it difficult to even read a recipe without a photo… I certainly can’t blog about it.

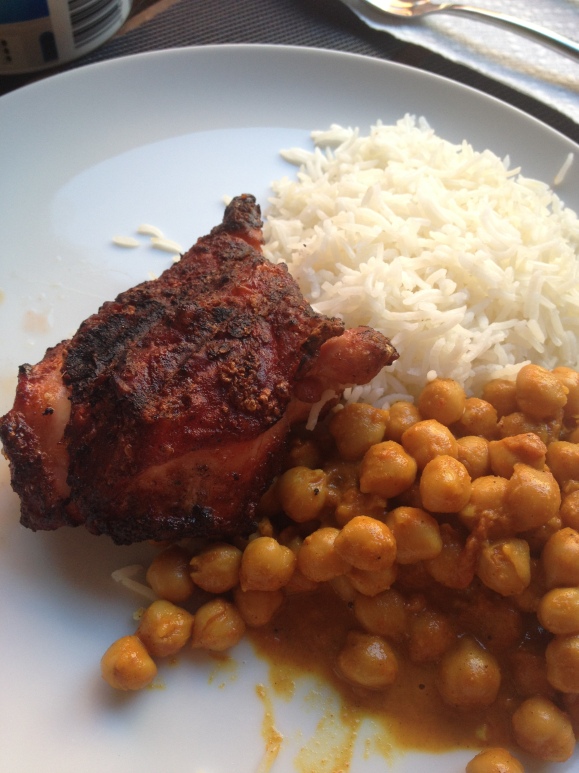
Well it so happens, I was at a friends cabin over the holidays and made one of the easy meals I just wasted over 100 words blabbing about…and I took photos (well 1 photo). It is a recipe from Vij’s at Home. (If you are in the unfortunate situation where you have never been to Vij’s Restaurant in Vancouver.. you must at some point make the trip.. you won’t regret it.) It is a play on traditional butter chicken served on breaded schnitzel. Delicious as is, but I find that sometimes I don’t have the patience to pound, bread, and fry chicken…. But the sauce on its own is so good, and so easy…so I use that, mix in some chickpeas (butter chicken meets chana masala anyone?), and grill some marinated chicken thighs. The outcome is a flavourful and easy meal and best of all can be made in 1 pot.

photo 2

Butter Chicken Sauce – minus the chicken, add in the chickpeas – with Grilled Tandoori Chicken.

Adapted from Vij’s at Home

Serves 4-6


Sauce

4 Tbs oil

6 cloves garlic, minced

1 can tomato paste

1 Tbs paprika

1 tsp turmeric

1 ½ tsp salt

1 tsp cumin

2 tsp garam masala

1 tsp coriander

1 tsp cayenne pepper

1 ½ c. water

1 ½ c. heavy cream

1 can chick peas, rinsed


Chicken

10 chicken thighs, skin on

2 Tbs Tandoori Spice Rub (or your favourite Indian rub)

2 Tbs water


For the chicken mix the tandoori spice and water to make a paste. Put chicken in large ziplock bad and pour paste over top. Massage into chicken with hands, and allow to marinate for atleast 6 hours, overnight is even better.

When ready to cook, preheat grill on medium. Oil grill and place chicken on hot grill. Cook until skin is crispy and chicken is cooked through. (For those that prefer white meat, try thighs once. I promise you you will like them cooked this way!)

For the sauce, heat oil in a pan over medium. Add garlic, and stir for 1 minute. Garlic will begin to stick to pot but keep stirring. Add tomato paste and stir to combine. Bring heat to high and add spices, while continually stirring for about 2 minutes to toast spices. Add cream and water and bring to a boil, stirring frequently. Once mixture is boiling, add chick peas and bring temperature down to low. Allow to simmer for 5 minutes to warm chickpeas and then remove from heat while you grill chicken.

Serve with rice and raita.


Happy 2013! Im back.. oh and recipe for Pesto, Pinenut, and Parmesan Halibut

Happy New Year!

I received an email a couple of days ago from WordPress that summarizes the past year of my blog. Turns out without really telling anyone about it I still managed to get about 1400 views in under 8 months. I know… still very small… but it baffled me how over 1400 people in over 28 different countries randomly found my little food blog. I find the whole thing a little embarrassing.. When I reread these little intros I realize how dorky they are and therefore why I never really promoted it…a truly vicious cycle. Well, I have come to the realization that really… it doesn’t matter. So I am embracing the dorkyness, and starting off 2013 with a promise to share more (because ok realistically I am not the most consistent blogger around), care less, and never (obviously) stop enjoying eating and cooking.

A Happy and healthy 2013 to you all…and here is a recipe that I have been meaning to post with many more to follow.

-Jenn

photo 3

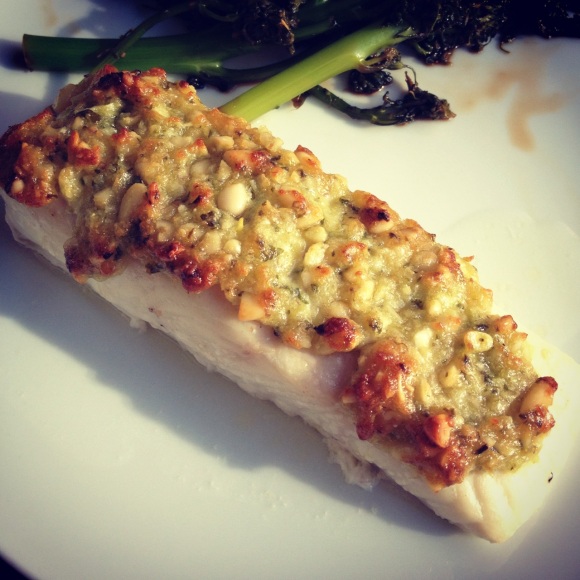
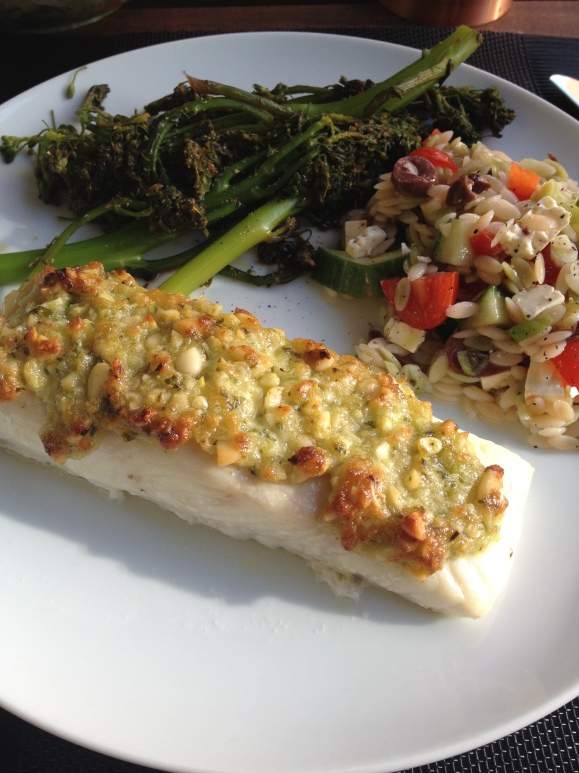
Pesto, Pinenut, and Parmesan Halibut

Serves 2


2 – 6 ounce Halibut fillets (or any other white fish)

3 Tbs pine nuts, coarsely chopped

2 Tbs parmesan Cheese

¼ tsp garlic, minced

1 tsp basil pesto

1-1/2 Tbs mayonnaise

photo 2

Begin by preheating oven to 400 degrees and follow by placing a piece of parchment on a baking sheet.

Remove the fish from the refrigerator to allow it to come to room temperature (or close) before cooking.

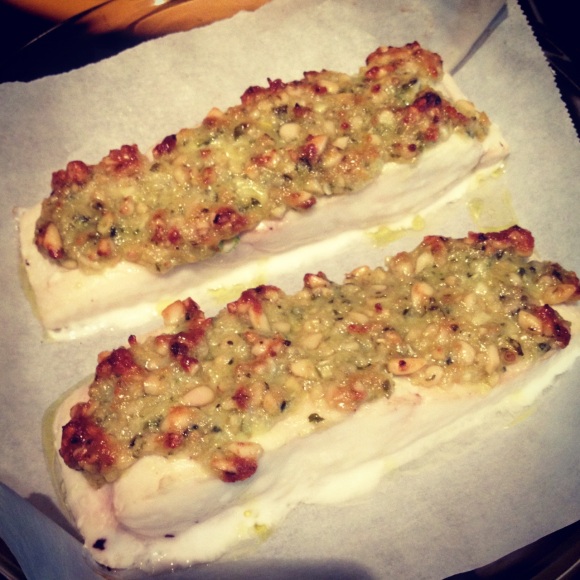
In the meantime, mix together nuts, cheese, garlic, pesto, and mayonnaise. Place fish on parchment and top with topping (pile it on, the more the better here!).

Bake for about 12 minutes until crust begins to brown and fish is cooked through (adjust time for type of fish used).

photo 1

Enjoy.

Slacking.

Alright so its summer and I am really slacking… Realistically we have only had about 3 weeks now of good weather so I haven’t been rushing to get on the computer once I am home. However, I wanted to share this recipe..

Chicken Paillard with a Summer Salad

Serves 2

2 boneless, skinless chicken breasts, pounded thin (I cut mine in half to fit more in the pan)

½ c. panko bread crumbs

2 Tbs parmesan, grated

Salt & pepper Minced herbs (whatever assortment you have on hand)

¼ c. flour (w/ salt & pepper mixed in)

1 egg whisked with 1 Tbs of water

1 large heirloom tomato

1/2 c. baby bocconcini balls

1 Tbs fresh basil, minced Handful of green beans, blanched & cooled

Corn removed from 2 ears of corn

1 garlic clove

1 Tbs balsamic vinegar

1 Tbs good olive oil

Salt & pepper to taste

Zest of 1 lemon

Pea shoots for garnish

Begin my mixing bread crumbs, parmesan, herbs, & salt and pepper in a shallow dish and then place the flour and the egg in 2 other shallow dishes. Take the chicken, and first coat in flour, then egg, then breadcrumbs (Pat breadcrumbs onto chicken so it is coated everywhere. At the same time have a non-stick pan heating up with equal parts olive oil and butter. Once hot, add chicken and fry each side until brown and cooked through (about 2 minutes per side). Once all chicken is cooked set aside on a paper towel lined tray and cover with foil to keep warm. (Don’t leave too long or it will get soggy.. if this happens just return to pan for a minute to crisp up.)

In a sauté pan melt ½ Tbs of oil, add 1 clove minced garlic and stir until fragrant. Add corn and sauté until corn is cooked through, about 4 minutes. Set aside.

In a large bowl mix tomato, bocconcini,  basil, green beans, corn, vinegar, oil, lemon zest. Season with sat & pepper to taste. Let sit for 10 minutes to meld flavours.

To plate, put a scoop of salad on each plate. Top with chicken and then pea shoots. Drizzle some of the dressing from the salad bowl ontop and serve.

Steamed Halibut Fillets with Ginger & Scallions

Being from Vancouver I think it’s basically a requirement to have been brought up on Chinese food. I mean come on who doesn’t love a heaping plate of chicken chow mien and beef and broccoli… I am fairly certain if you say you don’t you’re in denial.

Well these were atleast my favourites growing up until I came to the realization that these dishes aren’t exactly authentic Chinese. I have to admit, being a picky eater, a lot of what would be considered “authentic” are a little bit too weird or out there for me.. but give me a big plate of barbecued pork with chinese hot mustard and soy sauce chicken and I could enjoy it until I was stuffed beyond belief. Seeing as how I love these two dishes, why can’t I enjoy some other authentic style dishes… I mean I’m not really ready to step into the world of Chicken feet or anything but I could expand slightly.

Well last night I decided I would try and make steamed fish… To start off (I think it’s obvious by now I am still a little iffy on seafood).. I picked up some halibut.. and steaming a whole halibut would be somewhat difficult, so I opted for a couple of fillets. Following this I found a recipe online.. really I don’t actually know how authentic it is but seemed close enough for me… Steamed fish covered in green onion and ginger and then once cooked topped with heated soy sauce, sesame oil and a few other ingredients. Oh.. and I don’t have a steamer.. so I improvised… stuck some enoki mushrooms in the bottom of a pyrex bowl to create a flat surface for the fish, and placed this in the top portion of a pasta boiling pot with water steaming below. The end result… a tasty dish with the essence of a traditional and authentic chinese-style meal.

Steamed Halibut Fillets with Ginger & Scallions

Serves 2

2- 6 oz. Halibut Fillets

1 inch piece of ginger, sliced in long strips

2 green onion, sliced thin

Small splash of soy sauce

Sauce

2 garlic cloves, sliced thin

1 shallot, sliced paper thin

1 thai red chili, minced

1/2 “ piece of ginger, sliced in thin strips

1 shitake mushroom sliced paper thin

3 green onion, sliced thin

6 Tbs water

3 Tbs soy sauce

1 tsp sesame oil

½ tsp sugar

Begin my making the sauce that will top the fish.

In a small sauce pan heat 2 Tbs of vegetable oil until smoking. Add the garlic and stir until it begins to brown (Do not let it burn!). Add shallots and cook until shallots also start to brown, about 5 minutes. Add the thai chili and stir for a couple of seconds and then add ginger & mushrooms. Cook until mushrooms are soft and then add green onion and water. Bring water to a simmer and then add soy, sugar and sesame oil. Cook for a couple of minutes to let flavours meld. Taste and add additional salt or sugar depending on your liking. Remove from heat and allow to sit while you steam fish.

In a large pot bring water to a boil. While you wait, place fish in steamer (if you don’t have one use a pyrex bowl or plate that fits within your steaming pot with rooms on the sides to allow steam to circulate.) Again, I used enoki in the bottom of my bowl to create an even surface. The enoki actually had a good flavour after so you could use this regardless of steaming option if you like. Top fish with the ginger and green onion and a small splash of soy sauce.

Once water is boiling assemble your steamer over top and cover and cook until fish is just cooked through and flakey. For my halibut fillets this took approximately 9 minutes. Once cooked, carefully lift fish out of steamer onto a bed of rice. Top with sauce and enjoy!

Risotto with Balsamic Roasted Tomatoes

Risotto with Balsamic Roasted Tomatoes

3.5 c. chicken stock, heated

1 tsp olive oil

2 shallots, minced

2/3 c. arborio rice

1 Tbs butter

1 Tbs freshly grated parmesan cheese

Salt & pepper to taste

Lemon zest & juice (fresh!)


6 roasted tomatoes with reserved liquid from cooking.


Handful of arugula

Fresh basil


Heat a large deep skillet on medium heat. Add oil and once heated add shallots. Cook without browning until translucent, 8-10 minutes. Add Arborio rice and stir to coat with remaining oil.


Begin by placing ¼ c. of stock (which is warm) to the rice. Stir until liquid is almost all evaporated (never let it get too dry). Continue this, adding ¼ c. of stock at a time until rice is creamy but still al dante. This took me about 18 minutes and I did not end up using all the stock.


Once the last bit of stock has evaporated, add butter and cheese, stir to combine and season with salt pepper, some lemon zest, and a small amount of lemon juice.

Dress arugula and basil with some of the dressing in the bottom of the tomato pan and a small additional amount of good quality extra virgin olive oil.


Spoon risotto into two bowls, creating a small well in the middle. Place 3 roasted tomatoes in the centre and top with dressed arugula/basil mixture. Top with a small amount of pepper and a spoonful of the dressing from the tomato pan.


Enjoy!


Roasted Tomatoes


6 (around 1” round) vine tomatoes

2 Tbs olive oil

1 Tbs balsamic vinegar

1 spring thyme

1 garlic clove, minced

Salt and pepper to taste


Begin by preheating the oven to 325 degrees. In a small bowl mix oil, vinegar, thyme, and garlic. Place tomatoes in oven proof dish, season with salt & pepper and then top with mixture from bowl. Roast for about 45 minutes until skin has split and tomatoes are roasted. Serve warm.

Heirloom Tomato Salad

This looks so pretty on a plate I thought I would share.. Not much to it but you don’t need complicated if you have really good tomatoes.

Heirloom Tomato Salad

5 heirloom tomatoes (a mixture of sized and colours)

1 large ball fresh buffalo mozzarella

5 basil leaves, chiffonade

2 Tbs capers

2 Tbs good quality balsamic vinager

2 Tbs good quality extra virgin olive oil

Salt to taste

Slice tomatoes in ¼ inch slices, and spread out on a large platter and season with salt. Thinly slice cheese and top tomatoes. Sprinkle basil and capers over top and pour vinegar and olive oil ontop of everything. Let sit for atleast 20 minutes at room temperature.

A Secret Family Recipe – Slow Cooked, Pull Apart, Beef Brisket

I am lucky to say I 26 years old and I still have all my grandparents and a great grandmother that recently celebrated her 100 birthday. This is a woman who attributes her long healthy life to vodka, chocolate, and family. Family is very important to her, and that was apparent growing up when we would all cram into her far too hot, somewhat to small dining room to enjoy family dinners she had slaved over for days. This was passed down to both my grandma who still hosts us at her house, and my parents… and now to me.

Well on Sunday night, because my Dad was away doing the Ride to Conquer Cancer, I spent Father’s Day with Justin’s family. I was completely torn what to make, so I thought back to what I had at my family dinners and one dish kept popping into my head from my childhood… Beef Brisket… slow cooked in a mixture of spices and sauces until it was so tender and flavourful you didn’t even require a knife. I got ahold of my grandma and got her recipe, which I grew up with… and went on the hunt for a brisket. Below is the recipe… well sort of. It has been made so often over the years, that it’s all eyeballed.. there aren’t exactly measurements.. so I am doing my best to give you them.

The BEST beef brisket (courtesy of my grandma Lillian!)

Serves 10

6 lb beef brisket, trimmed of fat

Garlic powder

Salt & pepper

3 onions, sliced thin

¾ jar chilli sauce

2 Tbs dijon mustard

2 Tbs Worcestershire sauce

2 Tbs brown sugar

1 Tbs soy sauce

2 cups. Beef stock

¼ c. Sherry

1 Tbs butter

Ok so here we go..

Grab your brisket and season generously with garlic powder, salt, & pepper and let sit over night (I actually didn’t do this the first time, but if you have time do it.)

Before cooking, take the time to slowly caramelize 2 of the sliced onions. (I find if you add a small amount of water and brown sugar this helps with the process).

Combine chilli sauce, mustard, Worcestershire sauce, brown sugar, and soy sauce in a bowl.

In a roasting pan, just large enough for the meat, cover the bottom with one of the onions that has been thinly sliced. Put the meat on top (if there is any leftover fat, have that side facing up). Cover with caramelized onions. And then pour sauce over top. Cover with foil and put in a preheated 325 degree oven.

Cook for 90 minutes, then remove foil and continue to cook until you can insert a fork into the middle and the meat pulls apart (approximately 3-3.5 hours for a 6 lb piece of meat. Brisket will take approximately 30-40 minutes per pound.

Remove from oven and slice brisket in ¼” slices, against the grain (this is important!). Pour ½ of sauce into a small pot and discard (or save) the rest.

Here is where I am not sure. Start by adding 1 cup of beef broth and the sherry to the sauce in the pot. Stir and taste.. add more stock, sherry, brisket sauce, salt or pepper, until you achieve a good flavoured gravy.

Put sliced brisket back in pan and top with sauce mixture from pot. Top with Butter that has been cut into small chunks. Here you can either let cool and refrigerate (It is always better the next day) or return to the oven for 45 minutes to cook again in the sauce.

Serve this with potatoes or gnocchi mixed with butter and caramelized onions.

This is one of my favourite  recipes I hope you enjoy it too.

Fish Fillets with Zucchini, Tomatoes, & Wine

So I have been slacking… In my over eagerness about moving in I stocked my freezer.. and my stocked I mean CRAMED FULL. Well I have been working my way through it all, trying to finish everything.. so really I have had alot of quick meals thrown together with what I had lying around. We still ate well but nothing that really needs a long drawn out recipe or explanation for (pierogi, a tomato tart, a couple salads, steak & prawns – courtesy of Justin, etc….)

Well.. then my new Bon Appétit came and I found a recipe for a baked fish which looked so good, I decided to forgo another freezer meal and went and picked up some fresh fish. This was a simple and light meal with so much flavour. Served it with potatoes & salad… definitely going to make this again.

Fish Fillets with Zucchini, Tomatoes, & Wine (courtesy of Bon Appetit)

Serves 2

  • 1 cup very thinly sliced zucchini
  • ¼ cup thinly sliced white onion
  • 2 Tbs thinly sliced fresh basil, divided, plus an extra 2 Tbs basil leaves
  • 10 cherry tomatoes, cut in halves
  • 2 Tbs white wine
  • 2 Tbs extra-virgin olive oil, divided
  • Kosher salt, freshly ground pepper
  • 2   6-ounce skinless white flaky fish fillets.. I used Sole but you could probably use most white fish.

Begin by placing 2 pieces of parchment paper (14” x 12”) on your work surface. Fold paper in half, then unfold so you have created a crease. Layer the zucchini on one half of each piece of parchment. Follow by placing first the onions then basil on top of the zucchini. Now, place fish on top of the zucchini, onion, and season with salt & pepper. Scatter tomato halves around fish and top with 1 Tbs wine and 1 Tbs of oil (to each package).

Fold parchment in half and crimp all edges (I like to start at one side and roll paper moving continuously around the edges until the packet is closed. The point being you want a good seal so the fish and vegetables can steam within the package. Let the package stand for 15 minutes to briefly marinade.

Place packets on a baking sheet and put into a preheated 400 degree oven. Bake until fish is just cooked through (test with a toothpick), about 10 minutes. Cut open packages and if you want put under broiler for 1 more minute to slightly brown fish.

Garnish with extra basil leaves and serve!

Pasta al Pomodoro with Grilled Garlic Shrimp

This doesn’t need a big introduction. Pasta, Garlic, Basil, Butter, Prawns.. Kind of a no brainer.

Pasta al Pomodoro with Grilled Garlic Shrimp

¼ c. olive oil

½ medium white onion, minced finely

4 garlic cloves, minced

1 large pinch crushed pepper flakes

1 28-ounce can san marzano whole tomatoes, pureed

Salt

3 basil springs

12 oz. Spaghetti

2 Tbs butter

¼ c. Freshly grated parmesan cheese

1 recipe grilled garlic shrimp

In a large skillet, heat to medium heat, and add olive oil. Once heated, and onion and cook until translucent, then add garlic and chilli flakes and cook for 1 minute. Add pureed tomatoes and cook for 30 minutes to meld flavours.

While sauce cooks, bring a large pot of salted water to a boil and cook pasta 2 minutes less than the required cook time, thn add directly into sauce, add basil, butter, and cheese and stir until pasta is cooked and sauce sticks to the pasta. Taste and season with salt.

Top with grilled prawns and extra cheese.

Grilled Garlic Shrimp

¼ c. finely minced garlic

2 Tbs Olive Oil

1 Tbs beer

Pinch of crushed red pepper flakes

Salt and Pepper

Lemon

16 Large Shrimp

In a large bowl (or ziplock bag) combine garlic, oil, beer, red pepper flakes, and shrimp. Let marinade for 4 hours (up to overnight).

Remove shrimp from marinade and season with salt & pepper.

Prepare grill and once heated to medium high heat brush with oil (I prefer to use grape seed oil). Place shrimp on grill (use skewers if your shrimp are smaller), and grill for 3 to 4 minutes on each side until just cooked through.

Remove from grill, sprinkle with fresh lemon juice and serve.